


What is GitHub Actions?
GitHub Actions is a continuous integration and continuous delivery (CI/CD) platform that allows you to automate your build, test, and deployment pipeline. You can create workflows that build and test every pull request to your repository, or deploy merged pull requests to production.
From the Official Docs
In short, you automate these "boring" and repeated tasks without having to run it manually.
How to write GitHub Actions?
It is written in YAML. It stands for Yet Another Markup Language at first and then evolved into YAML Ain't Markup Language.
In general, the structure looks like keys with values from top to bottom.
key: value
YAML is pretty picky with indentation from my experience. I had a couple of time that action would not run due to incorrect indentation. 😑
Enough talk with stuff, let's see the setup!
Workflows
Workflows files usually go in .github/workflows folder.
Let's see the Jest setup that I am using now.
name: ci-jest
This is the name of the workflow. You could leave it empty, but it is better to have a name so you can see what it does in the Actions tab of the repo.

on:
  pull_request:
    branches: [main]
This is the trigger for the workflows. It is like event listener in JavaScript. The workflow will only run based on parameters that you define with on. In this case, the workflow will run on the moment once you open pull_request. branches is a "sub-rule" to pull_request. This means the workflows will run when the PR is opened and will merge into the main branch.
There are more triggers you can do with on and I highly recommend check Events that trigger workflows out.
jobs:
  jest:
    runs-on: ubuntu-latest
This is where you define and group the actions that you need to run the job named jest. You can define which OS to runs with, e.g. ubuntu, macOS, and window.
It is kinda similar to the package deal and you will get whatever in the package.
steps:
  - uses: actions/checkout@v3
  - uses: actions/setup-node@v3.5.1
    with:
      node-version: 16
      cache: "npm"
  - name: install and run jest test
    run: npm ci
  - run: npm test
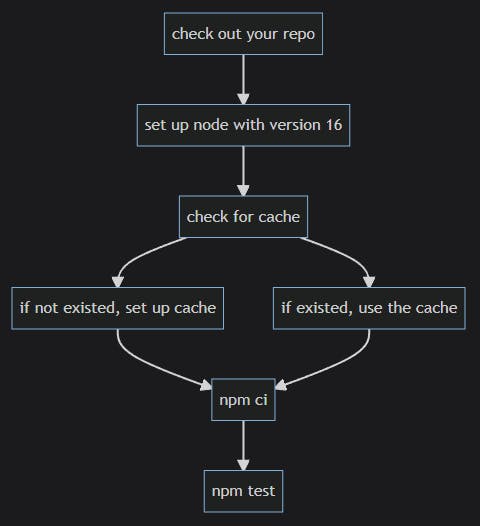
cache is to enable faster installation for the process.
In computing, a cache is a hardware or software component that stores data so that future requests for that data can be served faster; the data stored in a cache might be the result of an earlier computation or a copy of data stored elsewhere. according to Cache(computing) wiki
Think this way, you are set up a brand new folder and needs packages. You are installing everything from the beginning and this takes time to install. Cache is to hold your installed package information for the future, and allow the installation process to be faster.
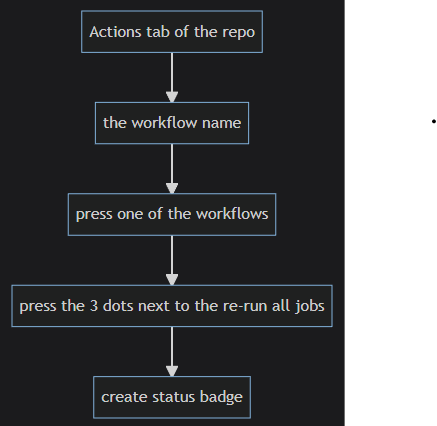
You can check how and what it runs by go to Actions tab of the repo. By the way, min stack is what I named for the PR.

If you are curious, you cna expand the dropdown and see what it does.

You also can set name for each uses action like below. Make sure there is no - for uses.
- name: Setup Node.js environment
  uses: actions/setup-node@v3.5.1
I didn't set name, so it says run actions/setup-node@v3.5.1 from the screenshot above. Once you set the name, you should see Setup Node.js environment instead.
Overall workflows code
name: ci-jest

on:
  pull_request:
    branches: [main]

jobs:
  jest:
    runs-on: ubuntu-latest
    steps:
      - uses: actions/checkout@v3
      - uses: actions/setup-node@v3.5.1
        with:
          node-version: 16
          cache: "npm"
      - name: install and run jest test
        run: npm ci
      - run: npm test
If you want to run with prettier, replace npm test with npm format:fix or whatever script name you are using.
Also, you could run 2 jobs in one file. Although, I am not sure if it is the best idea. It may be better to have one file for one job. Anyway, you could do this.
name: ci-jest-prettier

on:
  pull_request:
    branches: [main]

jobs:
  jest: # job 1
    runs-on: ubuntu-latest
    steps:
      - uses: actions/checkout@v3
      - uses: actions/setup-node@v3.5.1
        with:
          node-version: 16
          cache: "npm"
      - name: install and run jest test
        run: npm ci
      - run: npm test # depend on what you name the script in package.json
  format: # job 2
    runs-on: ubuntu-latest
    steps:
      - uses: actions/checkout@v3
      - uses: actions/setup-node@v3.5.1
        with:
          node-version: 16
          cache: "npm"
      - name: install and run prettier
        run: npm ci
      - run: npm format:fix # depend on what you name the script in package.json
Recap
What I know about the workflows is a small tip of the iceberg. It can automate more things for you. I have seen a couple of workflows that can auto-assign labels for issues, run prettier, deploy, merge schedule and more things. I sometime go to any organizations or anyone's repos and check out their workflows under .github/workflows to see what they are automating.
A tip for you, try to click all clickable links in Actions tab to see where each of them lead to. You don't need to add any workflows now, but to get familiar with interface. I just did this again and found out that you can add badges for your GitHub Actions status.
Note: for some reason, I cannot type "check" in the label box, so I used "press" instead. 😅

I hope this blog will help you to start with workflows quickly and start automate repeated tasks for you!
Resources
- 5 Ways to DevOps-ify your App - Github Actions Tutorial by Fireship
- I started with this video
- YAML Tutorial: Everything You Need to Get Started in Minutes
- Learn GitHub Actions - Official Docs
- GitHub Actions Crash Course By Laith Academy
Thank you!
Thank you for your time and reading this! Feel free to share your feedback in the comment below, and follow me on @viktoriacheng15
Originally published at victoriacheng15.vercel.app